

Deploy Heketi-Glusterfs for dynamic storage
In this post, I will show you how to deploy Heketi-Glusterfs on Kubernetes cluster for dynamic storage. Here I assumed that you already have a Kubernetes cluster, if not, please follow my previous blog to build one.
Cluster Status
Master nodes:
- k8s-cluster-k8s-master-1 192.168.147.6
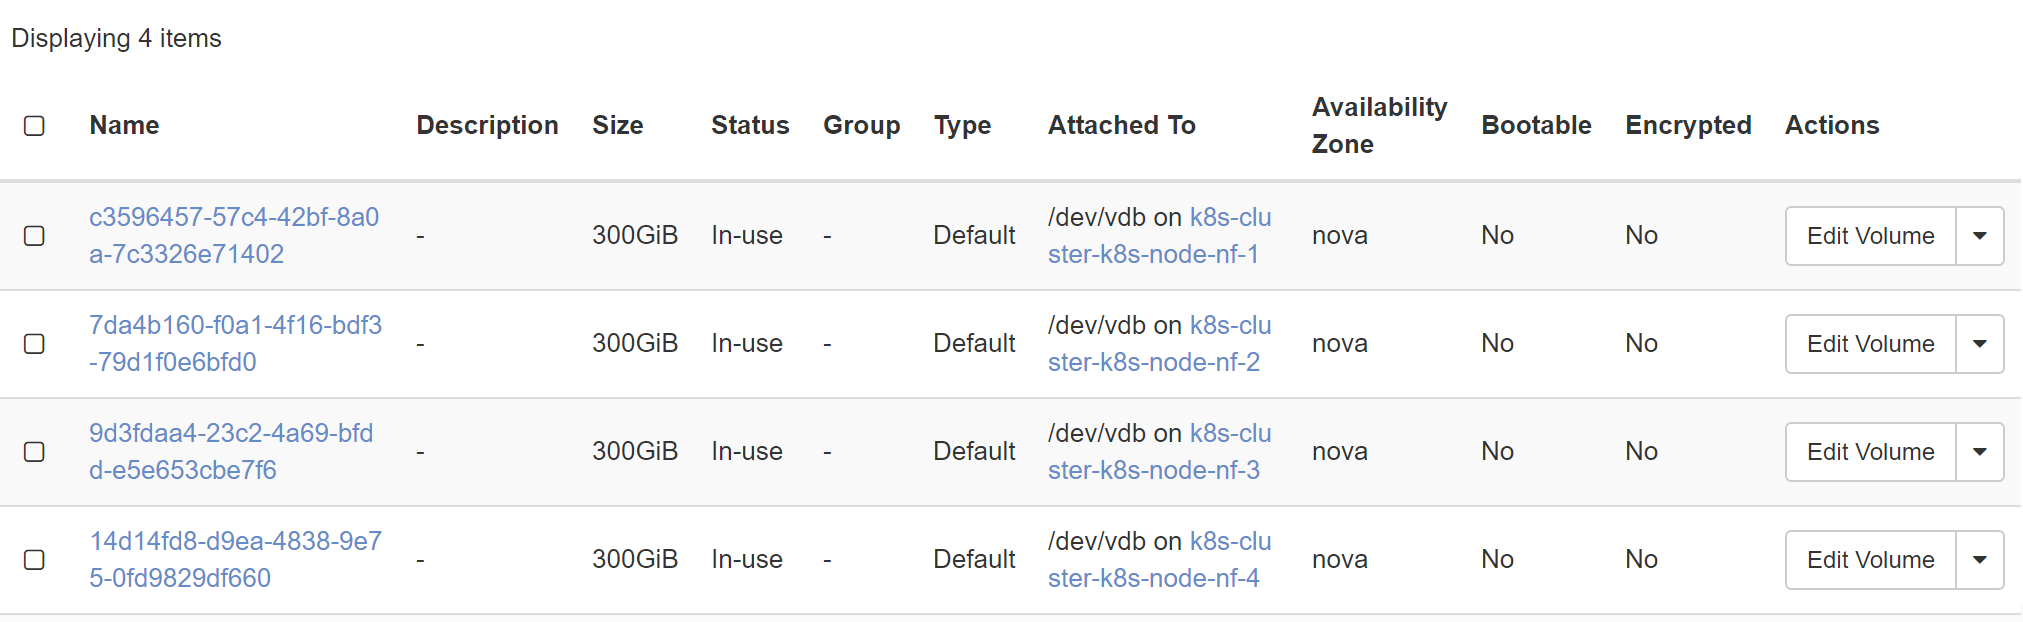
Worker nodes with volumn attached (/dev/vdb):
- k8s-cluster-k8s-node-nf-1 192.168.147.13 /dev/vdb
- k8s-cluster-k8s-node-nf-2 192.168.147.17 /dev/vdb
- k8s-cluster-k8s-node-nf-3 192.168.147.25 /dev/vdb
- k8s-cluster-k8s-node-nf-4 192.168.147.16 /dev/vdb
Note:
- You just need to create the volumns (‘/dev/vdb’) and attach them to the worker nodes, please don’t do anything else to the volumns.
Requirements
First of all, we need to install glusterfs and load lvm kernel modules in all of our nodes. We can use ansible-playbook to achieve it. Create a ‘prepare_heketi.yml’ file with content as below.
- hosts: all
  become: yes
  tasks:
  - name: "Load lvm kernel modules"
    with_items:
      - "dm_snapshot"
      - "dm_mirror"
      - "dm_thin_pool"
    modprobe:
      name: "{{ item }}"
      state: "present"

  - name: add latest glusterfs YUM repository
    yum_repository:
      name: glusterfs
      description: glusterfs repository
      baseurl: http://mirror.centos.org/centos/7/storage/x86_64/gluster-7
      gpgcheck: no

  - name: install glusterfs-fuse
    yum:
      name: glusterfs-fuse
      state: present
      update_cache: true

  - name: install glusterfs
    yum:
      name: glusterfs
      state: present
      update_cache: true


Then run
```bash
ansible-playbook --become -i hosts prepare_heketi.yml
Note:
- Using above setup, we will install glusterfs>=7, which is matched with the gluster versions we will deploy in the pods.
Remove taint of the master node.
kubectl taint node k8s-cluster-k8s-master-1 node-role.kubernetes.io/master:NoSchedule-
Download files for deployment
wget https://raw.githubusercontent.com/heketi/heketi/master/extras/kubernetes/glusterfs-daemonset.json
wget https://raw.githubusercontent.com/heketi/heketi/master/extras/kubernetes/heketi-bootstrap.json
wget https://raw.githubusercontent.com/heketi/heketi/master/extras/kubernetes/heketi-deployment.json
wget https://raw.githubusercontent.com/heketi/heketi/master/extras/kubernetes/heketi-service-account.json
wget https://raw.githubusercontent.com/heketi/heketi/master/extras/kubernetes/heketi.json
wget https://raw.githubusercontent.com/heketi/heketi/master/extras/kubernetes/topology-sample.json
Deploy glusterfs
Label the nodes which will used to deploy glusterfs
kubectl label node k8s-cluster-k8s-node-nf-1 storagenode=glusterfs
kubectl label node k8s-cluster-k8s-node-nf-2 storagenode=glusterfs
kubectl label node k8s-cluster-k8s-node-nf-3 storagenode=glusterfs
kubectl label node k8s-cluster-k8s-node-nf-4 storagenode=glusterfs
Modified ‘glusterfs-daemonset.json’, as
{
    "kind": "DaemonSet",
    "apiVersion": "apps/v1",
    "metadata": {
        "name": "glusterfs",
        "labels": {
            "glusterfs": "deployment"
        },
        "annotations": {
            "description": "GlusterFS Daemon Set",
            "tags": "glusterfs"
        }
    },
    "spec": {
        "selector": {
            "matchLabels": {
                "glusterfs-node": "daemonset"
            }
        },
        "template": {
            "metadata": {
                "name": "glusterfs",
                "labels": {
                    "glusterfs-node": "daemonset"
                }
            },
...
Deploy the glusterfs-daemonset by
kubectl create -f glusterfs-daemonset.json
Deploy heketi server
Create a keketi service account and grant it access to control the gluster pods.
kubectl create -f heketi-service-account.json
kubectl create clusterrolebinding heketi-gluster-admin --clusterrole=edit --serviceaccount=default:heketi-service-account
Create a Kubernetes secret to save the configuration of our heketi instance. Let’s modify the heketi.json as
{
  "_port_comment": "Heketi Server Port Number",
  "port": "8080",

  "_use_auth": "Enable JWT authorization. Please enable for deployment",
  "use_auth": true,

  "_jwt": "Private keys for access",
  "jwt": {
    "_admin": "Admin has access to all APIs",
    "admin": {
      "key": "adminkey"
    },
    "_user": "User only has access to /volumes endpoint",
    "user": {
      "key": "My Secret"
    }
  },

  "_glusterfs_comment": "GlusterFS Configuration",
  "glusterfs": {
    "_executor_comment": "Execute plugin. Possible choices: mock, kubernetes, ssh",
    "executor": "kubernetes",

    "_db_comment": "Database file name",
    "db": "/var/lib/heketi/heketi.db",

    "kubeexec": {
      "rebalance_on_expansion": true
    },

    "sshexec": {
      "rebalance_on_expansion": true,
      "keyfile": "/etc/heketi/private_key",
      "fstab": "/etc/fstab",
      "port": "22",
      "user": "root",
      "sudo": false
    }
  },

  "_backup_db_to_kube_secret": "Backup the heketi database to a Kubernetes secret when running in Kubernetes. Default is off.",
  "backup_db_to_kube_secret": true
}
Then we can create the secret by execuating
kubectl create secret generic heketi-config-secret --from-file=./heketi.json
Deploy the heketi container. To do so, you need to modify ‘heketi-bootstrap.json’ as follows.
{
  "kind": "List",
  "apiVersion": "v1",
  "items": [
    {
      "kind": "Service",
      "apiVersion": "v1",
      "metadata": {
        "name": "deploy-heketi",
        "labels": {
          "glusterfs": "heketi-service",
          "deploy-heketi": "support"
        },
        "annotations": {
          "description": "Exposes Heketi Service"
        }
      },
      "spec": {
        "selector": {
          "name": "deploy-heketi"
        },
        "ports": [
          {
            "name": "deploy-heketi",
            "port": 8080,
            "targetPort": 8080
          }
        ]
      }
    },
    {
      "kind": "Deployment",
      "apiVersion": "apps/v1",
      "metadata": {
        "name": "deploy-heketi",
        "labels": {
          "glusterfs": "heketi-deployment",
          "deploy-heketi": "deployment"
        },
        "annotations": {
          "description": "Defines how to deploy Heketi"
        }
      },
      "spec": {
        "selector": {
          "matchLabels": {
            "name": "deploy-heketi"
           }
         },
       "replicas": 1,
        "template": {
          "metadata": {
            "name": "deploy-heketi",
            "labels": {
              "name": "deploy-heketi",
              "glusterfs": "heketi-pod",
              "deploy-heketi": "pod"
            }
          },
          "spec": {
            "serviceAccountName": "heketi-service-account",
            "containers": [
              {
                "image": "heketi/heketi:9",
                "imagePullPolicy": "Always",
                "name": "deploy-heketi",
                "env": [
                  {
                    "name": "HEKETI_EXECUTOR",
                    "value": "kubernetes"
                  },
                  {
...
Then execute
kubectl create -f heketi-bootstrap.json
Configure heketi client
Download the heketi client and make it ready to use. (Note that the heketi client and sever should have the same version, which is 9.0.0 in this tutorial)
wget https://github.com/heketi/heketi/releases/download/v9.0.0/heketi-client-v9.0.0.linux.amd64.tar.gz
tar zxvf heketi-client-v9.0.0.linux.amd64.tar.gz
sudo cp heketi-client/bin/heketi-cli /usr/local/bin/
Modify the ‘topology-sample.json’ file to configure your cluster status (replace the ip addresses and node names with your own), e.g.,
{
    "clusters": [
        {
            "nodes": [
                {
                    "node": {
                        "hostnames": {
                            "manage": [
                                "k8s-cluster-k8s-node-nf-1"
                            ],
                            "storage": [
                                "192.168.147.15"
                            ]
                        },
                        "zone": 1
                    },
                    "devices": [
                        {
                            "name": "/dev/vdb"
                        }
                    ]
                },
                {
                    "node": {
                        "hostnames": {
                            "manage": [
                                "k8s-cluster-k8s-node-nf-2"
                            ],
                            "storage": [
                                "192.168.147.5"
                            ]
                        },
                        "zone": 1
                    },
                    "devices": [
                        {
                            "name": "/dev/vdb"
                        }
                    ]
                },
                {
                    "node": {
                        "hostnames": {
                            "manage": [
                                "k8s-cluster-k8s-node-nf-3"
                            ],
                            "storage": [
                                "192.168.147.8"
                            ]
                        },
                        "zone": 1
                    },
                    "devices": [
                        {
                            "name": "/dev/vdb"
                        }
                    ]
                },
                {
                    "node": {
                        "hostnames": {
                            "manage": [
                                "k8s-cluster-k8s-node-nf-4"
                            ],
                            "storage": [
                                "192.168.147.14"
                            ]
                        },
                        "zone": 1
                    },
                    "devices": [
                        {
                            "name": "/dev/vdb"
                        }
                    ]
                }
            ]
        }
    ]
}
Initialize the cluster
Set up envirnment variables for Heketi.
export HEKETI_CLI_SERVER=http://10.233.29.138:8080
export HEKETI_CLI_USER=admin
export HEKETI_CLI_KEY=adminkey
Note that ‘10.233.29.138’ is the ClusterIP of heketi service, which you can obtain by executing kubectl get svc|grep heketi.
Create the cluster
heketi-cli topology load --json=topology-sample.json
Now you may need to install device-mapper* if you want to have the heketi have persistent volumns.
You may need go back your local system and try to install device-mapper* on all the nodes.
ansible -i inventory/my-kube/hosts -m yum -a "name=device-mapper*" -u centos --become all
Generate ‘heketi-storage.json’ by running
heketi-cli setup-openshift-heketi-storage
In ‘heketi-storage.json’ file, we need to change the “heketi/heketi:dev” to “heketi/heketi:9”,
sed -i 's/heketi:dev/heketi:9/g' heketi-storage.json
Then
kubectl create -f heketi-storage.json
After the pod, ‘heketi-storage-copy-job’, is completed, you can delete the temporary heketi deployment used for setting up.
kubectl delete all,svc,jobs,deployment,secret --selector="deploy-heketi"
Finally, you can deploy the persistent heketi. Modify ‘heketi-deployment.json’,
......
"image": "heketi/heketi:9",
......
"spec": {
          "selector": {
            "matchLabels": {
                "name": "heketi"
            }
        },
......
Then create the deployment by
kubectl create -f heketi-deployment.json
Check the new ClusterIP for heketi by kubectl get svc|grep heketi and set it up again.
export HEKETI_CLI_SERVER=http://10.233.42.189:8080
We can check the HEKETI_CLI_SERVER is accessible or not, as follows.
[centos@k8s-cluster-k8s-master-1 build_heketi]$ curl $HEKETI_CLI_SERVER/hello
Hello from Heketi
Check the cluster id which will be used for storageclass-clusterid.
[centos@k8s-cluster-k8s-master-1 build_heketi]$ heketi-cli cluster list
Clusters:
Id:5108ea8a533e7366b26755470cf6d242 [file][block]
Finally, using the heketi clusters id, ‘5108ea8a533e7366b26755470cf6d242’, and resturl, “http://10.233.42.189:8080”, we can create our storageclass as follows,
kind: StorageClass
apiVersion: storage.k8s.io/v1beta1
metadata:
  name: gluster-heketi
provisioner: kubernetes.io/glusterfs
parameters:
  resturl: "http://10.233.42.189:8080"
  restuser: "admin"
  restuserkey: "adminkey"
  restauthenabled: "true"
  clusterid: "5108ea8a533e7366b26755470cf6d242"
allowVolumeExpansion: true
kubectl create -f storageclass.yml